
MacにmacOS以外のオペレーティングシステム、例えばLinuxやWindowsをインストールして使用する場合、ブートマネージャーと呼ばれるプログラムを使用すると便利です。
もっとメジャーなソフトは「rEFInd」と呼ばれるものですが、一度インストールしたあとに削除したい場合は、LinuxやWindowsのパーティションを削除するだけではだめで、自力でrEFIndを削除しなければなりません。
そのままだと電源を入れるたびに上記のような起動メニューが表示され続けてしまいます。
今回はmacOSからrEFIndを削除する方法を説明します。
コマンドラインから削除
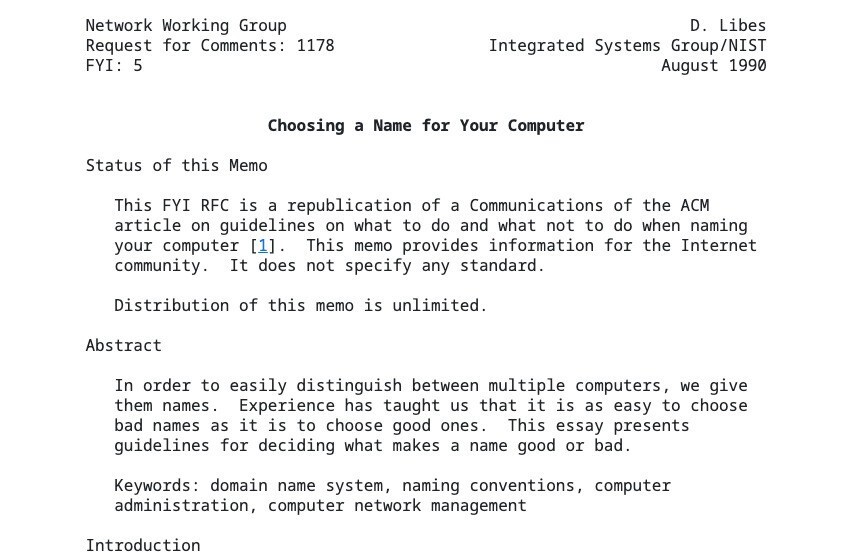
rEFIndのインストール方法は、公式ドキュメントで以下のように説明されています。
- You must first determine where rEFInd is installed. This can be any of
several locations:
- If you installed rEFInd 0.8.3 or earlier with the default options,
or if you used the --notesp option with rEFInd 0.8.4 or
later, it will be /EFI/refind on your main partition- If you installed rEFInd 0.8.4 or later with the default options, or
if you used the --esp option with rEFInd 0.8.3 or earlier,
it will be in EFI/refind or EFI/BOOT on the
ESP.- If you used the --ownhfs option to refind-install,
rEFInd will be in the System/Library/CoreServices
directory on the volume you specified.- If you installed rEFInd manually, it will be wherever you put
it.- In all cases, there could be duplicate (inactive) rEFInd files in
unexpected places. This is particularly true if you tried
installing rEFInd multiple times, each with different options to
refind-install. Thus, if you delete rEFInd and it still comes
up, you may have deleted the wrong files. (Note that dragging files
to the Trash may have no effect, though—at least, not until
you empty the Trash.)- If necessary, mount the ESP or rEFInd-specific HFS+ volume, as
described in Installing rEFInd Manually Using Mac OS
X. (The mountesp script that comes with rEFInd will handle
this task.)- Verify that rEFInd is installed in the directory noted in step #1. If a
refind.conf file is present, rEFInd is almost certainly
installed in that directory. If not, it's not rEFInd there and you
should not proceed. Be extra cautious about deleting the
System/Library/CoreServices directory, since that's
the default location of the OS X boot loader! Never delete this
directory from your OS X root (/) partition, only from the
partition you specified to refind-install using the
--ownhfs option.- Once you've identified the rEFInd directory, delete it, or at least the
rEFInd boot file. This file may be called refind_x64.efi,
bootx64.efi, boot.efi, or conceivably something else.
You may need to use sudo rm at the command line to accomplish
this task, as in sudo rm -r
/Volumes/ESP/EFI/refind.
かなりの長文ですが要はrEFIndのインストールディレクトリを削除すればいいの模様。rEFIndのバージョンやオプションによって方法が異なるため複雑になっているようです。
最近のバージョンのrEFIndを普通にインストールして使っている場合、EFIシステムパーティションにインストールされるため、Super Userで説明されている方法で削除可能です。
まずEFIシステムパーティションの識別子を探します。以下のコマンドを実行するか、
diskutil list | grep EFI | awk '{print $6}'

単に「diskutil list」で目で見て確認しても同じです。大抵「disk0s1」だと思います。これを利用して削除します。
sudo mkdir /Volumes/efi
sudo mount -t msdos /dev/disk0s1 /Volumes/efi
sudo rm -rfP /Volumes/efi/EFI/refind
sudo bless --setBoot --mount /
EFIシステムパーティション(この場合disk0s1)をマウントし、保存されているrefindディレクトリを削除し、最後にblessコマンドで起動ボリュームを設定しています。

再起動してrEFIndの起動メニューが表示されなければ成功です。
まとめ
rEFIndのアンインストールはインストールに比べると少し面倒です。手順をしっかり理解して間違えないように実行しましょう。